
Girls Weekend Craft Project
The boys went to Father-Son Weekend at Living Waters Bible Camp, so I tried to put together a fun-filled weekend for us girls, too!
Friday afternoon we went to McDonald's Playland and did a little shopping. We watched a movie & popped popcorn on Friday night, and woke up early on Saturday morning for the twins' basketball practice. (They get to play Little Chieftains on the Saturday mornings in January. It is a HIT with my girls!) After basketball, we took a tractor battery back to Farm & Fleet for Dad (see I told you we had FUN!) and ate lunch at Pizza Hut. The bonus at Pizza Hut was that the entire meal was free, thanks to the girls' Book-it slips and the restaurant screwing up our order. Our local Pizza Hut is very gracious about such things, and so I was proud of Paige when she put her own $5 on the table to tip the nice waitress. (I have challenged our children to spend $5 of their Christmas gift money from Grandpa on someone else in need. And waitresses at family restaurants are, in my opinion, very deserving!!)
We spent all Saturday afternoon shopping. I had to pick up a few groceries, but most of the time was devoted to letting the girls look at whatever they wanted, which is a special treat in itself. I let each of the girls pick out a top from my favorite store, and they also got to pick out their favorite scrapbook paper at Ben Franklin for a craft project. Again, we hit the jackpot this weekend for bargains, as all of the paper was 70% off. I haven't done formal scrapbooking in years, but I know how expensive that stuff can get!
On Saturday night we tackled the big craft project, magnetic photo boards. I was originally going to have the girls make these as Christmas gifts, but we ran out of time so I saved it for this Girls Weekend. And I'm so glad I did! We had a blast making these!

The thought of magnetic boards first came to me as we were browsing at the Galena Country Fair in October. Ally and her cousin picked up fabric-covered ones there, but they were a bit on the smallish side. Great for your locker, but not big enough to hold more than a few pictures or notes. So when I saw these burner covers at the local thrift shop, I snatched them up for a few quarters.
Step one: Drilling the holes for hanging.
Prior to the weekend, Mark drilled a few holes in the rim of one side, I sanded down the sharp edges, and they were ready for the project. I bought some clear stones at Dollar Tree, some heavy-duty craft magnets, Mod Podge, and Clear Tacky Craft Glue at Walmart (with adhesive on one side), and we were all set!
Step two: Covering the metal. I decided to use paper instead of fabric, because I was afraid that it would be difficult to get the fabric taut enough, let alone ensure that it would stay "stuck" to the burner covers. I'm so glad we decided to use paper instead! The paper was very easy to work with, and I think it turned out great with the mod podge "matte" finish.

The hardest part of this project is probably measuring and cutting the paper to fit the burner covers. Since the covers were 20 by 11", each one took two 12" by 12" sheets of scrapbook paper. We pushed the paper over the edges of the burner cover, creasing it where it needed to be cut. (We discovered that creasing was easier than measuring/drawing the cut line with a pencil.) We overlapped the two pieces of paper to make sure that the entire surface was covered.

Step three: Modpodging!! Pour some glue onto paper plates, give each girl a brush, and let them go to town. The beautiful thing about modpodge is that you really can't screw it up. But you do have to work fairly quickly, to make sure that the glue doesn't dry. After "painting" the back of the papers, flip them over and set them into position on the burner covers. Then paint over the top (pretty side) of the paper, as well.

Hold your mouth right, Shae! (as Grandpa E. would say!)

The faster you modpodge, the less "wet" it gets and the less bubbles, it seems.

Since Ally's paper was thicker and shiny/metallic, she did not apply modpodge to the front of her paper. We just put her entire board under some heavy books overnight, to make sure that the paper would stay attached.

Step four: Decorating the magnets. (My favorite part!) Take your clear stones and trace them onto your favorite scraps of paper. (We used contrasting papers from an old stash I keep.) Step four-and-a-half: kiss your daughter's chubby little fingers!!

Squirt a few dabs of clear craft glue onto the paper, and attach to the back of a clear stone. Then attach a magnet (I bought adhesive ones, but we ran out so we just glued some old refrigerator magnet strips to the back of some)...wa-la!


Ally's magnets turned out exquisitely. I just love the colors she picked, and see how the stones magnify the patterns on the paper?

Step five: Making the hanger. Cut a long strip of ribbon (also from my stash), thread it through the holes, and tie it in a knot.

Now your board is ready to hang! Paige seems to be in most of these pictures because she was the one who worked the quickest. I was amazed at how she sailed through this project!
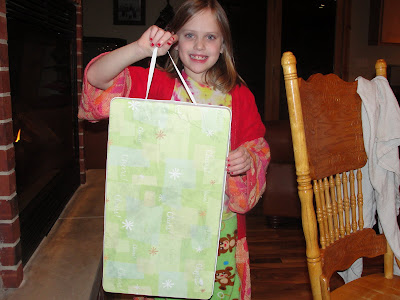
Step six: Add photos and notes! You could also glue on more ribbons, bows, rick-rack or whatever you wanted to enhance your bulletin boards. The great thing is: no pins, no pin-holes, and you can custom-design to match the colors in your room.

Of course, you could make the boards hang horizontally instead of vertically, but I didn't want to take up too much horizontal wall space in the girls' bedrooms. You could also use cookie sheets; just make sure they're the magnetic kind!

The girls were excited to do a bigtime craft project like this. We had our nerve-wracking moments, but their boards really did turn out beautifully. Great job, ladies!
Let all that you do be done with love.--1Corinthians 16:14
posted by Amy Siegert | 11:24 AM
![]()
![]()
4 Comments:
Amy- those are FANTASTIC! What a neat idea! I've been looking for a project to do with the girls (we haven't been doing much crafting lately) and I think these magnetic boards would be a big hit with Annika & Ava. :-) Thanks for the idea!
Hey Astrid, they turned out better than the pictures show. You could jazz them up even more, and glue ribbon along the edges, but I didn't have that much ribbon. (I try to use what I have on hand.) The faster you work with the modpodge, the less bubbles you get...found that out the hard way! Have fun!
Hey...where did you get the glass beads? baubles? rocks? that you used to make your pretty magnets?
It's been a while since I've used mod podge. Thanks for the advice!
Found the glass stones at Dollar Tree!
Post a Comment
Subscribe to Post Comments [Atom]
<< Home